Sunday, May 27, 2012

Singer 66

I took the leap, everybody. I bought a vintage sewing machine!


A year ago I didn't really see any reason for me to own a vintage machine. My grandma's Viking Husqvarna  from the 1970s works just fine, and I don't like a lot of clutter in my life. Three months ago I was beginning to really admire the machines featured over on Male Pattern Boldness. They make beautiful stitches. (Who knew most modern machines don't do a real straight stitch? Not me!) They have all-metal parts. (Who prefers cheap plastic over metal? Not me!) They easily pierce through thick layers of denim and leather. (Well, some of them.) They operate quietly. (Who wants a noisy motor? Not my poor roomies!) They're pretty. In the last month I began surfing Craig's List for all things sewing-related and admiring the nice old machines that would pop up here and there. Just window shopping! I don't know the first thing about owning or operating a vintage machine anyway. I can just look. It's harmless.

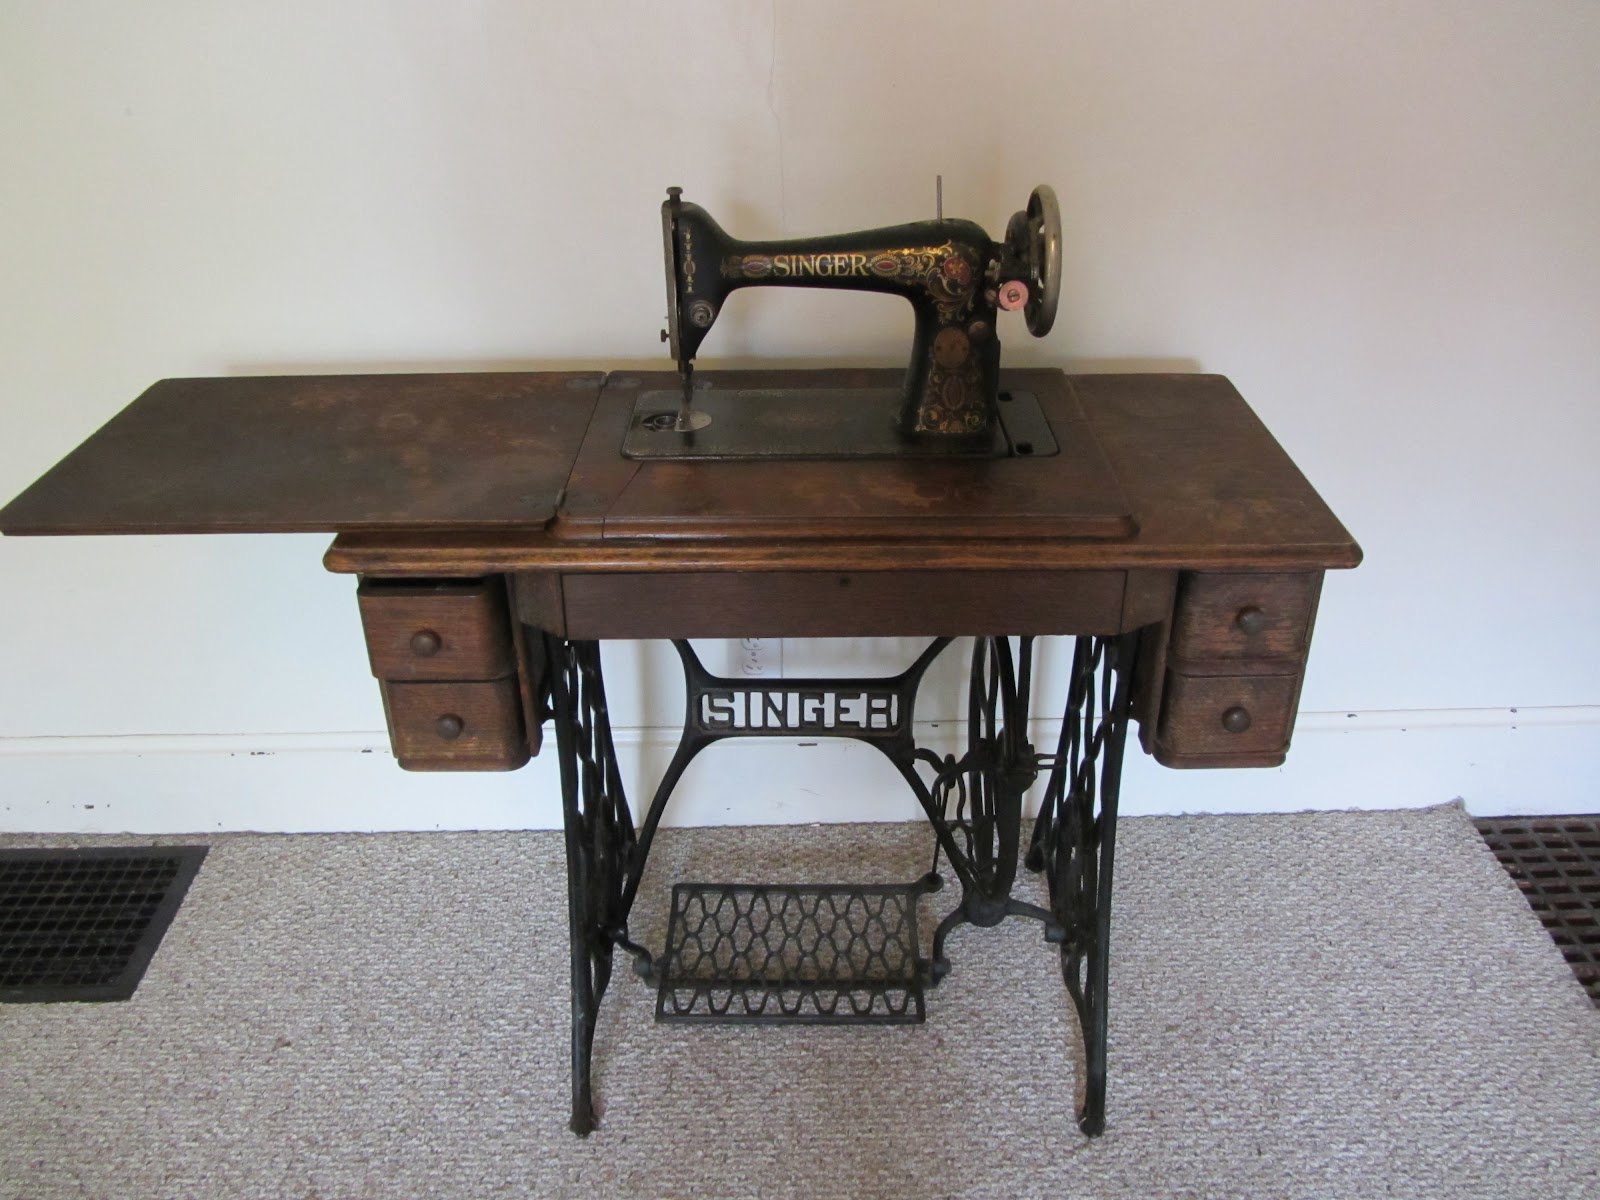
But then I saw this machine...


Such a beautiful design, still in its cabinet. Oh, and with all its parts...

I mean... it even says, "Best Set of Steel Attachments." Period.

Oooooh...

Ahhhh.... (ah, did someone try to staple the belt back together? Yes, yes they did.)


Even its little booklet is included, albeit in rough shape. It's a Singer 66. I looked up the serial number on this website, and apparently the serial number was issued in 1923. I might still have resisted, but I turned the wheel on it and all the parts moved smoothly. Also, it was only $75. Also, my birthday is coming up soon. Am I justified? Please say yes.

Here are some other similar machines I found on eBay. I did a search before buying to see if the price was right.

Same model but a little older and without cabinet

Same model, 13 years older, very nice condition with a beautiful cabinet

No cabinet, but with a motor!
I think I did alright. I know, I know - people like Peter find nice machines for around $50 (or less!) on Craig's List and at flea markets in the big city, but I don't live in the big city. I live in Indiana. I have no idea how many nice, old sewing machines are floating around the town where I live, but it's definitely not as many as in New York!

That $75 price tag seems like a deal to me. Then again, this machine is not in mint condition. Despite turning smoothly, it is quite dirty. Yesterday I spent all afternoon going at it with q-tips and some Dr. Bronner's Almond Oil Soap (diluted with water). This I did based on the advice of Elizabeth over at My Sewing Machine Obsession. Her blog name is fitting. I've also been consulting treadleon.net. If you don't know about Captain Dick (I didn't), and if you're interested in vintage machines, definitely check him out. I'm quite charmed by his wealth of knowledge combined with the old and clunky website.

Anyway, Elizabeth said "q-tips and Dr. Bronner's" so that's what I did. Here's a sequence of photos to show you what I'm cleaning through...


edit: I just realized... this looks like the Eye of Sauron glaring out of the darkness.


And the box of q tips...


ewww
I'm not even half done. Maybe... a quarter done? Maybe. Plus I have to clean the insides which will be a whole nother adventure.

Wish me luck!

Wednesday, May 23, 2012

I made jam!

I don't wanna brag or nothin, but...

I MADE JAM!!!


And it's so tasty! I could sit down and eat a whole bowl of it right now. It's so fresh and fruity, it reminds me of staying over at my best friend's house when I was eight. Her mom always had her own homemade strawberry jam, with big chunks of strawberries and not too much sugar. It was soooo delicious and we would eat it on french toast whenever I spent the night. I was thinking about that jam all the while I made my own, which is why I'm SO EXCITED that this jam tastes just as good.

But it's not strawberry jam. It's saskatoon berry jam. Yah. I never heard of a saskatoon before yesterday. Now I'm in L-O-V-E, all thanks to my food-smart friends who identified these bushes in the middle of downtown Bloomington.

My friend Leigh, doing some urban gathering.
They are called saskatoons, serviceberries, sarvisberries, juneberries, sugarplums, wild plums, shadbush, shadwood, shadblow, chuckley pear, or wild pear (according to Wikipedia). Leigh thinks they taste like fruit punch. Wikipedia says they taste somewhat like blueberries. Maddie said they are related to almonds somewhat and have bitter almond flavor in the seeds and SHE'S RIGHT. And it's delicious. I love almonds.


The berries are ready to be picked when they are purple, but a lot of times birds get to them first. Luckily these bushes still had a lot of good ones left. 


So here's what I did, in case you are lucky enough to have your own saskatoons. I bought the only pectin available at the market near my house, which happened to be Pomona's Universal Pectin.


I don't know nothin about pectin, but apparently this is pectin extradordinaire - at least that's what the box says. The box calls for much less pectin per cup of fruit than the recipe I found in my friend's canning cookbook. Being a newbie to jam, this had me confused and nervous so I searched online and found this blog post about using this particular pectin. I used it as a guideline for the amounts, and ended up using:

  • 4 cups saskatoon berries
  • 1 cup strawberries (from our garden!)
  • 1 1/2 cups sugar (roughly)
  • juice of one lemon
  • 2 tsp pectin
  • 2 tsp calcium water (you make this with the packet of calcium that comes with the box using 1/2 cup water and the whole packet, then you store the extra water for later in the fridge)


The cooking process was not very scientific. I dumped the berries and calcium water together in a pot, let it get bubbling hot, mashed it together with a potato masher, added the lemon juice, and added the sugar and the pectin. I let it bubble a little more, stirred it a bit, and then dumped it in a jar. I didn't can it properly, because that's another hassle for another day, and I'm pretty sure we'll eat it up before the week is done anyway.

Those are strawberries from our garden - not bad eh?

mashin

the results
As you can kinda see by this picture, it made enough to fill an old jar of Bubbies Sauerkraut (25 fluid ounces) plus some extra (probably another 12 ounces). It was much quicker and easier than I expected, although I'm sure that if I did the whole canning process I would change my tune. Or should I say, my saska-tune. Ahahaha. Sorry.

So that's it! My first adventure in jam making. I highly recommend you try service berries sometime. I think they are even more delicious as jam. It really brought out the almond flavor. As for Pomona's Pectin, I can't judge whether it is any better than regular pectin, but I do like that I didn't have to use a ton of sugar. I also think that maybe I would use less pectin next time because the jam ended up a little more solid than I might have liked after it cooled. Once you spread it on some hot toast, however, the consistency turns just right again. So who knows! Anyone else out there ever try saskatoon jam before? Have any tips on using pectin?

The Thankful Procrastinator

Several weeks ago, Tina over at the Sew Weekly organized an online pattern swap. I rushed to join, because  whenever I read about real-life pattern and fabric swaps I am filled with wistful longing - there are no blogging seamstresses in close vicinity to me (that I know of), and I'm certainly not on my way to London or San Francisco or New York or any other place where these meet ups and swaps tend to happen. Plus, this is a fantastic way to send off some patterns I'll never use.... although I may have traced off a thing or two before I sent my swap gifts off in the mail.

Here is what I sent:

Simplicity 2087

Simplicity 5698
Photos are courtesy of the Vintage Patterns Wiki because I forgot to take photos before I sent these off in the mail. I hear my swap partner (on the receiving end) was pretty pleased, which is always nice to hear. I finally feel like I've given back to the sewing community a little. If I don't manage to sell any patterns through my Etsy store in the next month, they may be destined for future swaps and giveaways because it's really gratifying to see them go to happy homes.

Giving gifts is fun. Getting gifts is really fun, especially when they're as cute as this:


I've been wanting to make a shirt dress for a while, and the princess seams make this one really lovely. Oh, and my gifter was so kind as to include some cute green polka dot ribbon too. And it came all the way from a seamstress in New Zealand. Thanks so much Kat!

Now... where can I find that perfect eyelet....?

Monday, May 14, 2012

Summer Sorbetto and a finished skirt

Finish projects, will blog. It's not an idiom yet, but maybe I can get it to catch on. I have two more finished makes to share. Hopefully this is the beginning of a summer-long trend! First, I have a skirt which was languishing unfinished for over a month on my sewing table.


The main fabric is something I bought off eBay - always a gamble when it comes to fabric shopping. I was looking for something with an art deco feel, although many people have since told me that it looks like an African print, and I agree. I'm not sure about the content. It was advertised as rayon, which it might be, but there could be other synthetics mixed in as well. It's very lightweight and likes to fray so I finished the side seams with bias tape.


The waistband is just some linen I bought from Joann's. I copied the waistband from another skirt pattern, but for the skirt pieces themselves I just cut two rectangles of different lengths. I tried making this a dirndl skirt first, but I quickly remembered how much I hate dirndl skirts on me. The bunchy-ness above the butt is not flattering. So I undid it all and created inverted pleats instead, remembering this lovely skirt made by Tilly:


The pleats fixed the bunchy butt problem, but then I had issues with the length. I didn't do much in the way of measuring when I cut my rectangles, and I ended up having to shorten the hem quite a bit before I found a length that felt flattering.


Short enough to show the knees, long enough to swing from trees. Or something like that. I'm pretty happy with the outcome of this skirt, and especially with my success doing a lapped zipper for the first time.


I'll just call it a testament to my skill that you can barely see it in this picture. I followed a very helpful tutorial over at What Would Nancy Drew Wear but hand picked (prick stitched?) the last steps to keep it neat, ala Sunni's tutorial here. I also applied interfacing in strips to the seam allowances where the zipper was inserted, which really helped for dealing with this slippery and delicate fabric. If I had been wise, I think I would have cut the interfacing to be twice as wide as the seam allowance so that my hand-stitching had reinforcement has well (it falls outside the seam allowance). Next time.

Coming off a high from finishing up this skirt and my 1970s blouse, I decided to tear through another project with a stash-busting Sorbetto...

contemplating my next project?
This fabric is another rayon print, challis this time. I picked it up last summer at the Re-Store when they were selling a giant pile of fabric by the grocery bag. I didn't have a whole lot of it, so I think Sorbetto was a good choice. Well, kinda. I'm not too impressed with the pattern, although it's a free pattern so I suppose I can't complain too much. But I had to make several adjustments. I made the neckline scoop lower (a solid two inches), and if I ever make it again I think I'll also make the straps a little longer. For some reason the shoulder seam on the straps seems too far forward. I also had to scoop out a little at the bottom of the armholes, which were too tight. Finally, I added on a few inches to the length, but next time I might add even more. It wants to come untucked as is.


Instead of using bias tape, I added piping to the edges and pressed the seam allowances to the inside. It probably could still use some kind of finishing on the inside, so I will either catch-stitch it down or top-stitch on the outside, catching the seam allowance underneath. Not too fancy, just an easy top to wear during the summer and to my shifts at the coffee shop.

I'm happy to be adding some separates to my self-made wardrobe. I think I may actually get a lot of wear out of these this summer!

The fabric connection and some love for Cambie

No sooner did I photograph my shirt for last week's post, than I stumbled upon someone else who is loving the same floral swiss dot:

Molly of Molly's Sewing and Garage Sale Adventures
Very pretty! This dress is Tasia's newest pattern, Cambie. Nice work Molly, and excellent taste in fabric. I have yet to invest in one of Tasia's patterns, but I love seeing what she produces. Even better is seeing all the different versions sewn up by talented people around the sewing web. I think this one is especially cool:

Susan of Knitter's Delight
I think the fabric is perfect, especially because it's not too "sweet." You can see Susan's post on her stylish digs here. As Tasia puts it, this dress pattern has a lot of sweet to it already what with the full gathered skirt, the sweetheart neckline, and the gathered cap sleeves.

Anyone else planning a Cambie this summer? Anyone else stitching up that floral swiss dot from Joann's?


Tuesday, May 8, 2012

Summer Sewing Revival

What do you call it when you have time to sew, multiple barbeques on this week's calendar, farmer's markets and gardens overflowing with greenery, and plans for camping in the near future? Total bliss? Summer? I have a lot of fun things to report on, but I won't spew it all out in one blog post. For now, let's talk summer sewing.

After mailing off a grant application last week, I attacked some of my unfinished projects. I even have some stuff to show for it, because absence makes the seamstress sew faster. I finally finished the 1970s blouse from this McCall's 5233 pattern:


Here it is, modeled and photographed clumsily.


The material is a light cotton swiss dot from Joann's. I worked mostly with pieces I pulled out of their (overpriced) remnants bin, so I had to add a seam up the center front. I think the seam gets lost in the pattern, but Josh of course noticed it immediately. Whatever Josh! Lots of blouses have seams up the center front, phhshhh. Here's a closer photo so you can see some of the details...


Well, you can kinda see them. There are little pintucks on either side of the front placket. I gave up trying to make them exactly according to the pattern markings. Instead, I just folded and and ironed until the length matched the yoke piece and both sides were symmetrical. Anyone have better tips for pintucks? The collar is rather ridiculous when not folded back - it pops like a frat boy who starches his shirts. But big collars are a thing of the seventies, right? I'll have to get you a photo to demonstrate.

The construction on this was rather fiddly. Plackets like this are hard! At least, it's hard not to get little wrinkles at those 90 degree corners. But I think I managed okay. I omitted the facing pieces because they were awkward and I thought finishing the edges with bias tape made more sense. You even get to catch a peek of it! See...


Polka dots! I ordered this stuff off Etsy, and I think it's a nice touch. Elsewhere I used french seams or more bias tapes, so the inside is nice and tidy.


Not the tidiest job of applying bias tape, but that stuff is fiddly (again with the fiddly). I am proud that I made it turn the corners on the placket, however. To do this I had to open the bias tape, fold it right sides together, and then sew two 45 degree angles meeting at the fold. I'll try to get a demo up later. The most difficult part is measuring the spacing correctly so that your two corners end up matching the corners on the placket.

Summery blouse completed! And how fitting, that my first occasion wearing it out was to a a very summery event: a night at the drive-in.


Happy Summer!