Monday, August 18, 2014

Two Lilies

I have a new favorite pattern. A new old pattern, as it was released more than two years ago. I know that's really not so long, but in the sewing blogosphere I think we may have short attention spans. Ooh! Anna!  - Ooh! Archer!  - Ooh! scuba knit! - Ooh! Kimonos! I think it's because we have a never-ending flow of inspiration and interesting new patterns and fabrics to try, which is hardly a bad thing. Anyway, I'm always a few years behind the trend, and I'm just now getting around to sewing up Colette Patterns Lily.

Lily dress pattern - envelope line drawing
Everyone else might be through with Lily already, but I felt like I was uncovering a gold mine when I made this up for the first time.

my floral Lily pencil skirt
I sewed only the bottom half, as you can see. I started a new job this summer and was in need of office attire. Rather than buy a pencil skirt pattern, I looked at Lily and thought it would do the trick. Did it work?


HELL YEAH! Why haven't I seen this elsewhere on the sewing blogweb? I kinda feel like a genius for being the first to convert Lily into a skirt, but I also feel like it's so obviously a good idea that I can't get too much credit for it. (BTW please ignore my obvious lack of styling. I took these after work and couldn't even be bothered to leave my shoes on.)


This thing fit perfectly without any fussing, which was SO NICE. That really doesn't happen often for me. I consulted the finished garment measurements on the envelope and went with the size that would give me just slightly negative ease, since I was using a stretch sateen. As usual, I graded from a smaller size at the waist to a larger size at the hips. No problem. And it worked like a charm. (Like my flowers? That's six years of marriage - So far so good!)


I squeezed this baby out of 1.25 yards of fabric (I think) which required a little creative thinking. I ended up having to make the pockets just slightly smaller, but that's no biggie. They're still plenty big. And I love them.


I didn't make the pocket flaps, but used piping instead. Also, I wore this skirt out somewhere and a man noticed and commented on my piping. Why thank you for noticing sir. I am impressed by your sewing vocabulary.


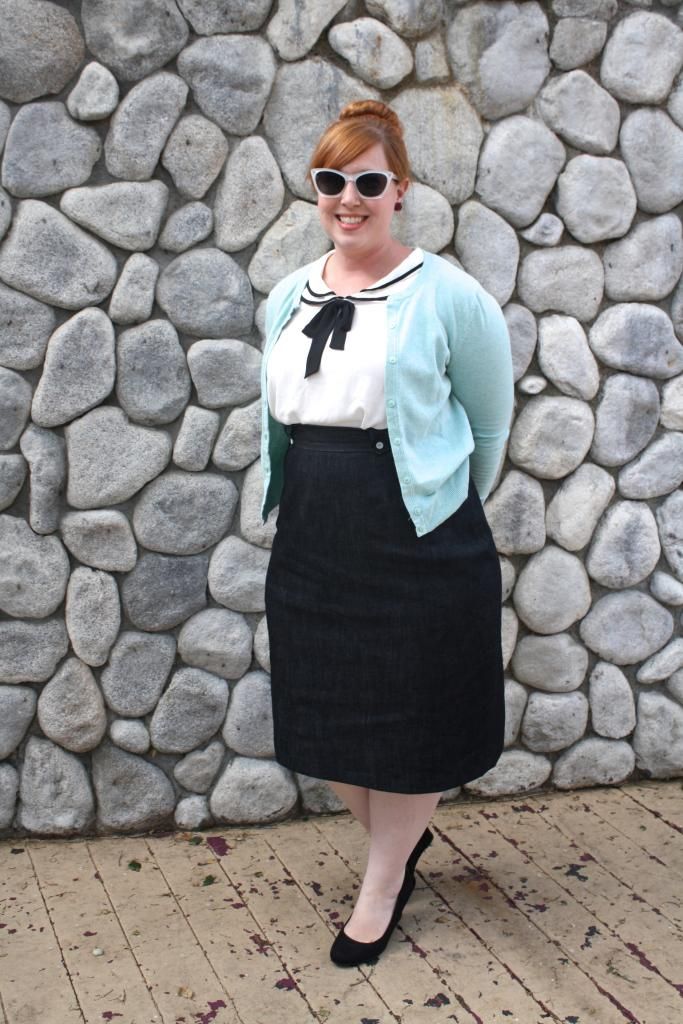
Now actually, this is the second Lily I've made. Ready to see number one?


I love it too. It is slightly more practical than my loud floral Lily, but it too is made of stretch sateen.


You may notice that is slightly different from my floral version. For one, it is shorter. Another sewing blogger said she thought Lily is a tad short, and I agree. Not too short. In fact, it seems very accurately portrayed in both the line art and the model photos. And I like the length of my navy version. But too be prim and office-y I made my second version a tad longer. Also my floral version is a tad taller in the waist, because I wished it so for the second version. The original isn't too low, I just wanted to have a high-waisted skirt.


Still, it's a dang good fit for what I only expected to be a wearable muslin. I apologize that it's hard to see much detail on the navy.


I swear this looks more wrinkly in photos than it does in person. Whatever. The wrinkles don't bother me so much.


I was inspired to add tabs with buttons after admiring this Betsy pencil skirt sewn up by Melissa of Scavenger Hunt:

I love both these skirts so much, and they are getting plenty of wear at my new job. The stretch woven makes them very comfortable, and I love the princess seams for giving an excellent fit. I like this pattern so much that I'm already working on my third version - this time with the top half. And I'd like to make a few more skirt versions as well... and maybe a version that's just the top. With a peplum? With a knit? Seriously, I feel like this pattern has loads of potential, just waiting to explode all over the place. Nice job Colette Patterns.


Okay, now that I'm done gushing, I do have a few small beefs with the pattern. But really, they are quite small. First is the length of the vent in back - it just seems too short. Not for functional reasons, but just because to my eye the proportions look wrong. Compare the two versions below:


See how the vent on the navy version seems a bit puny? I made it longer in the floral version, and I like it better. It's a small thing, but there ya have it. It's hardly going to keep me from enjoying the skirt though.

The second issue is not the pattern's fault really. As much as I love the princess seams for giving a nice fit, they are a pain in the tuckus for ironing these things.


I don't know if it's the fabric's fault or what, but the seams I pressed open don't want to stay open, and all those seams make for some tricksy ironing. Oh well. Again, it's not going to keep me from wearing them. But I would love to make a version with flat felled seems, which I think would solve the problem nicely. I could also just serge the seam allowances together instead of serging the two sides separately, which might also help. But I thought it'd be nice to be able to let the seams in or out over time, so I did it the hard way. Live and learn.

Coming soon - yet another Lily (and perhaps another), and more swimsuit bottoms!

Sunday, August 10, 2014

Lessons Learned - Bikini Sewing

Okay, before I let another month pass between posts, I'm going to share the rest of my "lessons learned" from sewing my first swimsuit. After that, it's time to move on to other sewing projects because holy moly - fall is coming!

10 Tips for Sewing Your First Swimsuit

Tip 1 - You kinda really don't need a serger

I say kinda, because I found I could get away with using my sewing machine for almost everything. Also, serger seams with all their extra threads tend to add bulk, which can be a real problem for a neatly sewn bikini (more on that later). By my fourth try sewing bikini bottoms, I was only using my serger for joining up the crotch and side seams, which is really the easiest part of the process.

serged side seam on bikini bottoms
Sewing these seams was the first step in sewing my bottoms. I tried doing this on my sewing machine to see if I could get away with not using my serger at all, however, it tended to stretch the seam out as it sewed. So I ended up using my serger for these seams and nothing else. I'll bet if I spent enough time fiddling with the tension settings on my machine, I could get it to sew these seams just fine. So if you're worried about sewing a swimsuit without a serger, I say go for it! It just may take a few practice trials to get the right stitch tension.

Tip 2 - If you have a walking foot, use it. 

walking foot on my Husqvarna
When I first tried sewing the Bombshell swimsuit last summer, one thing I couldn't seem to wrap my mind around was how I was supposed to pull slightly on the fabric or elastic at the front of machine while I sewed and at the same time still get the fabric to advance under the needle. With wovens, that doesn't seem to be a problem. With spandex, it felt like a tug-o-war where everyone was losing. I think using my walking foot really helped with this problem. I could put tension on the fabric in front but still get everything to advance forward.

Tip 3 - It's possible to unpick stitches in spandex - even serger stitches.

For some reason when I first tried sewing spandex, I had a mental block again unpicking my stitches. I thought for sure that what with using a serger that uses a million threads and cuts your fabric as a you sew, if you didn't get it right the first time you were pretty much f-ed. Don't know why I thought that, but it's not true. Behold this lovely piece of sewing:

bikini side seam gone wrong
I don't know how I managed to match up such a short seam so poorly. But I was able to unpick it and redo. It wasn't a whole lot of fun, but I fixed the error and my final product was no worse for it. I also found that it's possible to press spandex with your iron AT A VERY LOW HEAT. You can do it, just be careful.

Tip 4 - Sew the main seams of your lining and outer fabric separately, and then combine the two.

For my first pair of bottoms, I sewed the lining fabric and outer fabric as one, as though the lining was an underlining. I even carefully basted the two layers together to make it easier to sew them as one.

lining and outer fabric basted together
I think I learned this method from the Bombshell pattern. But when I looked a pair of RTW swim bottoms, I found that they had sewn the lining and main fabric separately at the main seams, and then inserted one in the other. To illustrate, here's a picture of my first pair, with underlining method, next to my final pair, with lining method.


On the left, you can see the serged seams are exposed on the inside. On the right, they are hidden between the lining and main fabric. I'm not sure that this makes much of a different in comfort for wearing the bottoms, and I'm almost certain you can't tell the difference in looks from the exterior, but I just like the second method better for how it looks on the inside. Also, I think it helps reduce seam bulk a little.

Tip 5 - When sewing the main fabric and lining together, line up the seams and position seam allowances in separate directions.

Once you have sewn your main seams (sides and crotch), all you have left to do is put the lining inside the main fabric and start sewing on the elastic. A good way to minimize bulk at the seams during this step is to make the seam allowances of the lining and main fabric point in opposite directions. I tried to show this in the picture below.

Seam allowance of main fabric is pushed to the right, seam allowance of lining is pushed to the left.
Thanks to Brian's awesome video tutorial on inserting swimsuit elastic, I learned that getting a neat finish on a swimsuit is really all about reducing bulk whenever possible. This is one way to achieve that. Which brings me to...

Tip 6 - Neaten all edges before sewing.

In a regular garment, you can sew a seam and go back and clean up the seam allowances later, trimming away the excess and finishing them however you choose. Once you get to the point of inserting your elastic in your bikini, however, you need your seam edges to be nice and even. The reason is that you'll be using a zigzag stitch that is supposed to just barely catch the edge of your fabric as you sew - and that's hard to do if your fabric edge is sometimes 1 mm from your elastic and sometimes jumps out suddenly to 10 mm. For example, if you look at this seam, you can see where some misaligned seams left me with a little jump or stair step in the leg opening:


In a different sewing project I wouldn't sweat that little imperfection, since it would fall within the seam allowance anyway. But for a swimsuit, you want to trim away that stair step to make a nice continuous line for inserting your elastic. Again, Brian does an excellent job of explaining these sorts of things in his tutorial, so I recommend you watch it. Sorry if I sound like a broken record, but Brian saved my bikini and now I love him forever. That being said... my next tip goes against Brian's advice.

Tip 7 - Zigzag top stitching is easier.


And I think it looks just as nice. When it comes time to flip your elastic to the inside and top stitch it down, Brian prefers a straight stitch. I tried this, and found it very difficult to get a consistent stitch length, what with the elastic and stretching as you sew and all that. Here are two samples of my top stitching:

top stitching with straight stitch
You can see in the photo above where my stitches got quite small in places. It was especially hard to control the stitch length over the bumpy side seams (once again - bulk is bad). Your sewing machine might handle these things better than mine, but I preferred the results I got with a zigzag stitch. 

top stitching with zigzag
Again, it was hard to keep a consistent stitch length and you can see where my stitches got narrow at the side seam. Overall, however, I think I liked the zigzag stitch better. Brian thinks it looks less professional, but I'm okay with it.

Tip 8 - Just go slow.

I think this is true of a lot of tricky sewing. Things that seem impossible become simple if you just slow down. I didn't bother doing basting stitches after that first bikini. They were a pain to rip out later, and I found that I could achieve just as nice a result if I pinned carefully and slowed down.

lining pinned to main fabric, ready to insert elastic

Tip 9 - Use a wider elastic at waist and under bust.

I didn't do this on my first bikini, but after wearing it all day on the river I noticed that the waist and under bust elastic want to flip the wrong way. You can kinda see how the bikini top also wants to ride up under the bust in the photo below.

wrinkles at under bust from top riding up
Next time I'll use a wider elastic and hopefully that will stay put better. No big deal.

Tip 10 - Don't substitute regular elastic for swimsuit elastic.

I thought I could get away with this when I ran out of swimsuit elastic while finishing the swimsuit bottoms for my roommate. But just like jersey and spandex do not have equal amounts of stretch, neither do regular elastic and swimsuit elastic. Here's a crappy cell phone pic to demonstrate:

regular elastic in left leg hole, swimsuit elastic in right leg hole
Can you see how the regular elastic on the left created a smaller leg opening than the swimsuit elastic on the right? The regular elastic resulted in an uncomfortably snug fit. I ended up having to unpick all my zigzag stitches. Not fun. I don't know why I persist in trying shortcuts like this, because the end result is almost always the same - unpicking stitches.

So there are my ten tips! I hope other swimsuit noobs find some of these helpful, and that they send you on your way to your first of many successful swimsuits!

Sunday, August 3, 2014

Lessons Learned - Bikini Drafting

[This blog post is going up much later than I intended! My sewing exploits were interrupted this month by a change of houses, but now I'm settled in again. Time to pick up where I left off...and sorry if this seems so last month - because it really is!]

First off - Holy crap! I was not expecting my last-minute submission to the Sporty Summer Sewalong to be chosen from among all the contest amazing entries. I jumped out of my chair when I saw that Karen has listed my name in second place, and I ran and woke my husband up from his nap to tell him. (I had to repeat myself later when his grogginess subsided.) Maybe I shouldn't have disturbed him, but this is how sewists get their kicks. It's also nice to ogle all the other fantastic makes for the sewalong. Here's just a few to admire:

Some professional looking golf shorts by Nilla at Purple Pleats:


A flattering one-piece by Marilla:


And of course the winning entry by Canal Couture really takes the cake for sporty sewing. I love that she tackled making a highly functional garment for her boyfriend that suits his profession perfectly:


As I've been rather lucky when it comes to winning things around the sewing blog-o-sphere, I wanted to share some of the things I learned in the process of sewing my first swim suit. Hopefully some of these tips will help others struggling through their first adventures sewing bathing suits or other spandex-y things. I have a lot of stuff to say and pictures to share, so I'm breaking this up into two posts. This post is mostly about drafting, and I'll put sewing tips in my next post.

Tip 1 - Jersey ≠ Spandex

In trying to make my swimsuit, I first cut apart an old pair of underwear, thinking that this would give me an excellent starting point for drafting the bottoms.


Unfortunately, I wound up with bottoms that were an excellent fit for my size 0 roommate, instead of for size 10 me. On the bright side, I now have a pattern that is perfect for my roommate, and I made her a pair of bottoms too!

Tip 2 - Drafting bottoms to cover your bum

I don't know if this is exactly a tip, but when I finally arrived at a pattern that provided full bum coverage, it looked like I had drafted a diaper. Here are some pictures of my final pattern (left) next to the first version (right). This is the back:


You can see some of the differences better when I lay the patterns on top of each other:


That's a lot more paper/fabric in the final pattern. It took many different alterations. The most important one for bum coverage was dropping the leg hole seams and rounding them outward. The side seams were vertical lines in the original pattern, but this squeezed the crap out of the tops of my thighs, so I angle those out. My hips don't go straight up and down, so neither should my side seams. I also changed where the crotch seam is placed. In my original pattern, it was more toward the back. The extra length you see on the crotch on my finished pattern above brings the crotch seam more toward the front.

Here are the front pattern pieces (new on left and old on right):


You can see the crotch part got shortened on my final version of the front piece, so even though I lengthened the back crotch, the overall crotch length stayed them same. Why did I move the seam forward? Because you see how the original front pattern piece has a curved crotch seam? The back pattern piece had a straight seam, and joining the two was awkward and required many pins.


Also, that seam fell right at the area where I was having fitting issues (i.e. the bottoms were looking "cheeky" in that particular spot). I was trying to figure out how to add extra coverage right at that spot, and the seam there was making it more difficult. So I moved the crotch seam forward, and it solved everything. I have now said "crotch" way more times than I ever expected to in a single blog post. Crotch crotch crotch. Moving on... here are the two versions laid on top of each other


Besides changing where the "you know where" seam was located, I also added a whole lot more width at the sides. Like I said, the originals were sized for someone much smaller than I. So this is took them from a size 0 hips to a size 10 or larger hips. Also, the original pattern had the side seams more toward the front than at the actual sides. That makes sense for underwear, I think. If the seams are toward the front, they are less likely to show through your pants or skirt than if they were exactly at your sides. So the extra width I added moved the seam to my actual sides, which is fine for swimwear. I also angled the side seams out at the bottom (because hips).

Wow. That was a lot of info for a "tip." But I hope it helps for other people trying to alter their swimsuits to cover their bums.